Rear-End Collision Repair: Common Damage and Restoration Process

Collision Coachworks Team
Expert Panel Beaters
Rear-end collisions are among the most common types of vehicle accidents on South African roads. Whether it happened at a busy intersection in Parow, on the N1 through Bellville, or in stop-go traffic near Brackenfell, the rear-end collision repair process can feel overwhelming — especially if it's your first time navigating panel beating and insurance claims. This guide walks you through everything you need to know: the types of damage a rear-end collision typically causes, how professional panel beaters approach the restoration process, and what to expect at every stage from initial assessment to final delivery.
Why Rear-End Collisions Are So Common in Cape Town
Cape Town's roads — particularly the N1, N2, and the suburban routes through the Northern Suburbs — see a high volume of rear-end accidents daily. Heavy commuter traffic, tailgating habits, and the frequent stop-start nature of Cape Town congestion create the perfect conditions for low- to medium-speed rear impacts. Vehicles like the VW Polo, Toyota Hilux, Ford Ranger, and BMW 3 Series are among the most frequently repaired after rear-end incidents at workshops like Collision Coachworks in Parow Industria.
Even low-speed impacts — those that feel minor at the time — can cause significant hidden damage to your vehicle's rear structure. This is why a thorough professional assessment is critical before assuming the damage is cosmetic.
Common Types of Rear-End Collision Damage
The extent of damage from a rear-end collision depends on the speed of impact, the angle, the type of vehicles involved, and where exactly on the rear the impact occurred. Here is a breakdown of the most commonly encountered damage categories:
1. Bumper and Fascia Damage
The rear bumper is designed as a first line of defence, absorbing impact energy to protect the more expensive structural components behind it. In most low-speed collisions, the rear plastic fascia (the visible bumper cover) cracks, scuffs, or deforms. The energy-absorbing foam or plastic crash bar behind it may also be compressed or fractured.
Many drivers make the mistake of replacing only the visible plastic fascia while leaving a damaged crash bar in place. A reputable panel beater will always inspect and replace both components where necessary — failing to do so compromises your vehicle's ability to absorb the next impact.
Bumper repair or replacement in South Africa typically costs between R2,500 and R12,000 depending on the vehicle model and whether the bumper carries sensors, parking cameras, or other integrated components.
2. Boot Lid and Tailgate Damage
Higher-speed impacts often crumple the boot lid (on sedans and hatchbacks) or tailgate (on SUVs and bakkies). This type of damage is straightforward to identify but can be complex to repair correctly. Panel beaters must ensure the boot lid aligns perfectly after repair — misalignment creates gaps that allow water ingress, rattles, and wind noise. On bakkie platforms like the Ford Ranger or Toyota Hilux, tailgate damage is particularly common and often requires specialist jig work to restore correct fitment.
3. Rear Quarter Panel Damage
If the impact was slightly offset, one or both rear quarter panels may sustain damage. Quarter panels are typically welded to the vehicle's body structure, making replacement a labour-intensive process. Skilled panel beaters at workshops like Collision Coachworks assess whether the quarter panel can be repaired by pulling and reshaping the metal, or whether full replacement and re-welding is required.
4. Structural (Chassis) Damage
This is the most serious category of rear-end collision damage and the most consequential if left unrepaired. Modern vehicles are built with crumple zones — engineered sections of the chassis that deform in a controlled way during impact to absorb crash energy and protect the passenger cabin. After a moderate to severe rear collision, these sections may be bent, twisted, or compressed.
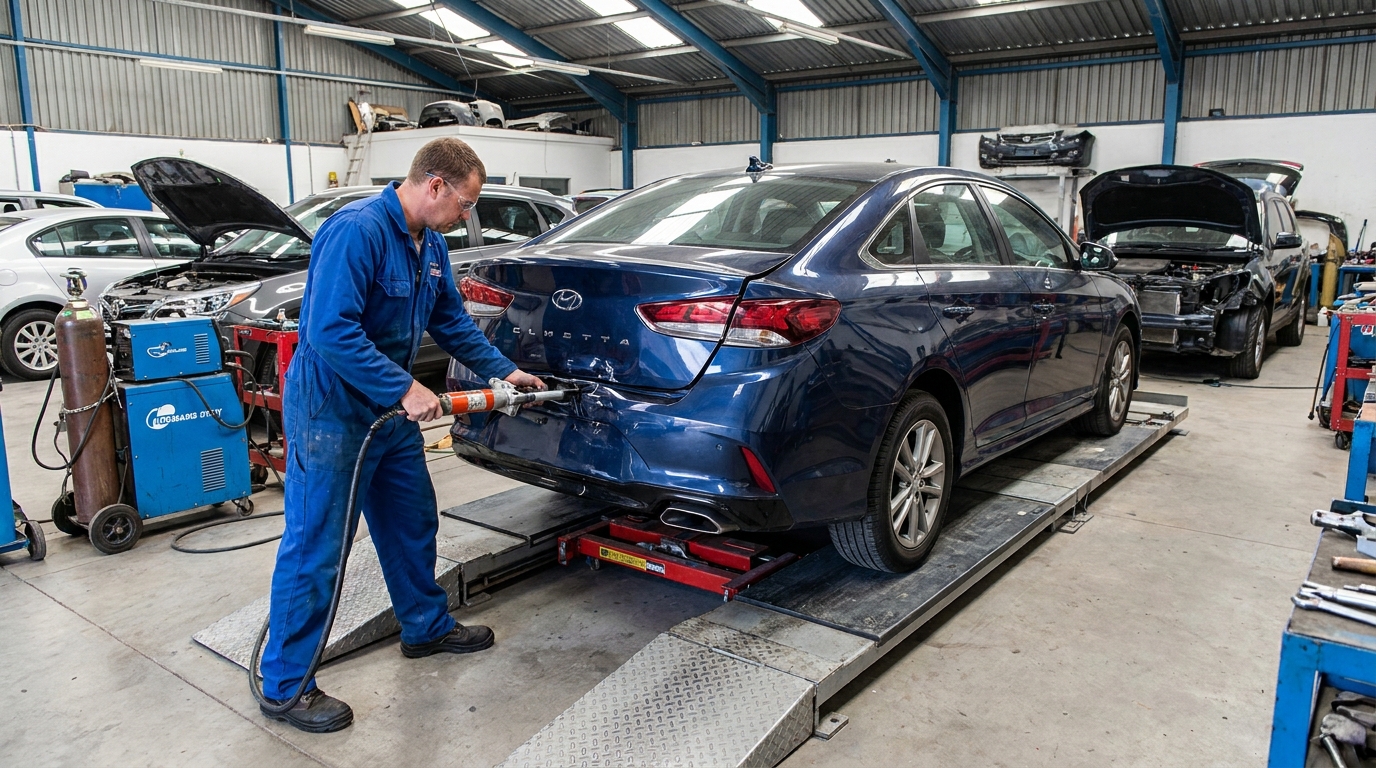
Driving a vehicle with unrepaired structural damage is dangerous: it affects handling stability, compromises the effectiveness of crumple zones in future accidents, and can cause tyres to wear unevenly. Collision Coachworks uses computerised chassis jigs and laser measuring systems to verify and restore the chassis to manufacturer specifications — work that requires professional-grade equipment unavailable to back-yard operations.
5. Cooling System and Mechanical Damage
On rear-engined vehicles (rare in SA) or vehicles where the spare tyre and fuel tank sit at the rear, a severe collision can affect mechanical components. More commonly, sensors embedded in rear bumpers — parking sensors, reverse cameras, trailer-hitch electrical connectors — may be damaged and require replacement as part of the repair.
6. Paint and Cosmetic Damage
Even where the underlying structure is intact, the paint is almost always affected. Scratches, paint transfer from the other vehicle, and exposed bare metal all require professional attention. A quality respray involves sanding, priming, applying base coat, and applying clear coat — then carefully colour-matching to the rest of the vehicle using computerised mixing systems.
The Rear-End Collision Repair Process Step by Step
At Collision Coachworks in Parow Industria, the rear-end collision repair process follows a structured workflow designed to ensure nothing is missed and the quality of the final result meets original manufacturer standards.
Step 1: Initial Assessment and Quotation
When your vehicle arrives at the workshop, a qualified assessor performs a full visual and physical inspection of the damaged area. For insurance claims, this assessment is documented and submitted to your insurer for approval. For private (cash) repairs, the quote is prepared and presented to you directly.
A thorough assessor will not just look at the visible damage — they will open the boot, inspect under the vehicle, check the alignment of the chassis rails, and test any electronic systems affected by the impact. This upfront diligence prevents costly supplementary claims mid-repair.
Step 2: Disassembly
Once the repair is approved, the damaged rear components are carefully removed. This includes the bumper fascia, bumper beam, boot lid or tailgate, trim panels, lighting clusters, and any sensors or cameras. Disassembly reveals hidden damage that may not have been visible from the outside — this is when supplementary damage is often discovered and the quote revised if necessary.
Step 3: Structural Straightening
If chassis or floor pan damage is present, the vehicle is placed on a jig. Hydraulic pulling equipment applies controlled force to straighten bent sections while laser measuring confirms progress against OEM reference data. This is skilled, precision work — and it's one of the key differentiators between a professional panel shop and a budget workshop.
Step 4: Panel Repair or Replacement
Damaged panels are either repaired (reshaped using specialist hammers, dollies, and shrinking tools) or replaced with new OEM or quality aftermarket parts. Welded panels like quarter panels require cutting, fitting, and re-welding with MIG welders, followed by grinding and finishing to restore a smooth surface.
After metal work is complete, body filler (stopper) is applied in thin layers to fill minor surface imperfections. This is then sanded progressively finer until the surface is perfectly smooth and ready for paint.
Step 5: Paint Preparation and Priming
Before any colour coat is applied, repaired surfaces are cleaned, treated with etching primer, and then spray-applied with high-build primer. This builds up the surface and provides a base that ensures the colour coat bonds correctly and achieves even coverage. The primer is sanded again with fine grit wet-and-dry paper.
Step 6: Colour Matching and Respraying
Achieving a perfect colour match is one of the most technically demanding aspects of collision repair. Collision Coachworks uses computerised spectrophotometers and mixing systems to analyse your vehicle's paint code and produce a formulation that accounts for any weathering or fading of the original paint. The vehicle is then painted in a climate-controlled spray booth to ensure dust-free, consistent results.
For rear sections, it's common to blend the new paint into adjacent panels (such as rear doors or sills) to eliminate any visible colour difference — a technique called panel blending or feathering.
Step 7: Clear Coat and Polish
Once the base coat is dry, two or more layers of clear coat are applied to protect the colour and provide the deep, glossy finish associated with a quality respray. After the clear coat cures, the surface is machine-polished to remove any texture (orange peel) and bring out maximum gloss.
Step 8: Reassembly and Quality Check
All removed components — bumpers, trim, lights, cameras, sensors, rubber seals — are refitted and adjusted. Panel gaps are checked against OEM tolerances. Electronic systems are tested. The vehicle is washed and inspected under bright lighting before delivery.
How Long Does Rear-End Collision Repair Take?
Repair time depends on the severity of the damage, parts availability, and whether structural work is required. As a rough guide:
- Minor bumper and paint damage: 3–5 working days
- Boot lid replacement with respray: 5–7 working days
- Quarter panel repair plus paint: 7–10 working days
- Full structural repair with multiple panel replacements: 2–4 weeks
Parts availability is often the biggest variable in Cape Town. Common models like the VW Polo or Toyota Hilux have readily available parts; less common vehicles may require parts to be ordered from Johannesburg or even imported, which can add several days to the timeline.
Insurance Claims vs Private Repairs
If the accident was caused by another driver, their third-party liability insurance (where applicable) should cover your repair costs. If you claim from your own comprehensive insurance, you'll typically pay an excess of between R2,500 and R7,500 depending on your policy.
For minor damage where the repair cost is close to your excess, it may be worth considering a private repair — particularly if you want to avoid the impact on your no-claims bonus. Collision Coachworks provides honest, detailed quotes for both insurance and private work so you can make an informed decision.
It's important to note that if another driver was at fault, you have the right to choose your own panel beater — you are not obligated to use an insurer's preferred repairer. Many insurers prefer their approved workshops because it keeps costs down for them, but a quality independent workshop like Collision Coachworks can achieve the same or better results.
What to Look for in a Rear-End Collision Repair Workshop
Not all panel shops are created equal. When selecting a workshop for rear-end collision repairs in the Northern Suburbs or greater Cape Town area, look for these indicators of quality:
- Computerised chassis straightening equipment — essential for any structural repair
- Climate-controlled spray booths — ensures dust-free, professional-grade paint results
- Computerised colour matching — the only reliable way to achieve an invisible repair
- OEM parts policy — quality workshops use original or equivalent-spec parts, not cheap imitations
- SAMBRA registration or industry accreditation — demonstrates adherence to industry standards
- Written guarantee on workmanship — protects you if problems emerge after collection
Collision Coachworks at 9 Assegaai Road, Parow Industria meets all these criteria and has built a reputation for quality repairs across the Parow, Bellville, Goodwood, Durbanville, and Brackenfell communities.
Conclusion
A rear-end collision — even one that seems relatively minor — can involve a complex combination of cosmetic, structural, and electronic damage. Understanding the rear end collision repair process helps you ask the right questions, make informed decisions about insurance claims, and choose a workshop that will restore your vehicle correctly and completely.
If your vehicle has been in a rear-end collision, contact Collision Coachworks at 9 Assegaai Road, Parow Industria, Cape Town. Our team provides honest assessments, detailed quotations, and professional repairs using industry-standard equipment. Call us or visit our workshop — we're here to get you back on the road with confidence.
Share Article
Need Expert Advice?
Get personalized consultation from our master technicians.
Related Articles
Mag Wheel Repair and Refurbishment in Cape Town: Your Complete Guide
Damaged alloy wheels don't always need replacing. Discover your mag wheel repair and refurbishment options in Cape Town, what they cost, and when to repair vs replace.
Roof Damage Repair: Hail, Impact, and Structural Fixes for Cape Town Cars
Cape Town's extreme weather exposes your car's roof to hail, branches, and more. Learn what roof damage repair involves, how long it takes, and what it costs at a professional panel beater.
Honda Civic and Jazz Body Repair in Cape Town: What You Need to Know
Own a Honda Civic or Jazz in Cape Town? Discover what makes these popular vehicles unique to repair, what collision damage typically costs, and how Collision Coachworks in Parow Industria delivers expert results.