How to Remove Swirl Marks and Fine Scratches from Your Car

Collision Coachworks Team
Expert Panel Beaters
Every car owner in Cape Town knows the frustration: you wash your vehicle, step back to admire it, and notice a web of fine circular scratches swirling across the paint in sunlight. These are swirl marks — one of the most common paint defects affecting daily drivers across the Western Cape. Whether your car is a VW Polo dealing with Bellville's busy roads or a Toyota Hilux tackling the Northern Suburbs each day, swirl marks are almost inevitable without the right care techniques.
This guide explains what causes swirl marks and fine scratches, how to remove swirl marks from your car at home, and when it is time to hand the job over to a professional panel beater or detailer in Cape Town.
What Are Swirl Marks and How Do They Form?
Swirl marks are microscopic, circular scratches in the clear coat of your car's paintwork. They appear most visibly on dark-coloured cars — black, navy blue, or deep grey — but affect all paint colours. Under direct sunlight or bright workshop lighting, they create a characteristic spider-web or circular pattern that can make even a well-maintained vehicle look neglected.
The most common causes of swirl marks include:
- Incorrect washing technique — Using a circular scrubbing motion with a sponge or low-quality cloth drags grit particles across the clear coat. This is the single biggest cause of swirl marks on domestic vehicles.
- Automated car washes — The rotating brushes in drive-through car washes trap dirt and grind it into the paint with every pass. If you use these regularly, swirl marks are almost certain to accumulate.
- Wiping a dusty car dry — A quick wipe with a dry cloth across a dusty Cape Town car is essentially sandpaper on your paint. Never dry-wipe a dirty surface.
- Dirty microfibre cloths and chamois leathers — Even quality wash media becomes abrasive when not cleaned properly between uses.
- Poor-quality polish application — Using a rotary polisher without experience, or applying polish in a circular motion by hand, can introduce new swirls while removing old ones.
Fine scratches differ slightly from swirl marks — they are linear rather than circular and are typically caused by keys, rings, car parks, overhanging branches, or brushing against rough surfaces. Both types live in the clear coat layer, the outermost protective coating over your colour coat.
Assessing the Depth of Scratches Before You Start
Before attempting any removal method, you need to assess how deep the damage goes. Car paint has four main layers:
- Clear coat — The transparent outer protective layer
- Colour coat (base coat) — The pigmented layer that gives your car its colour
- Primer — The adhesion layer over the bare metal
- Metal substrate — The body panel itself
The fingernail test is a reliable DIY method: run your fingernail gently across the scratch. If your nail glides over it smoothly, the scratch is only in the clear coat and can potentially be polished out. If your nail catches or drops into the scratch, it has penetrated the colour coat or deeper, and will require professional attention from a panel beater or spray painter.
Most swirl marks and many fine scratches are clear coat defects and can be addressed with the right products and technique. Deeper scratches — especially those that have cut through to primer or bare metal and may show signs of rust — require professional respray work to restore correctly.
DIY Methods: Removing Swirl Marks at Home
If your assessment confirms the damage is limited to the clear coat, here is a step-by-step approach to removing swirl marks from your car at home in South Africa.
What You Will Need
- Two-bucket wash system with grit guards
- High-quality microfibre wash mitt
- Car shampoo (pH-neutral)
- Paint finishing machine polisher (dual-action / DA polisher) — or microfibre applicator pads for hand correction
- Cutting compound or light abrasive polish
- Finishing polish or paint sealant
- Several clean, plush microfibre cloths
- Paint protection wax or ceramic coating (optional)
Step 1 — Wash the Car Correctly First
Thorough washing before any polishing is non-negotiable. Polishing a dirty car will introduce new scratches. Use the two-bucket method: one bucket with soapy water, one with clean rinse water. Always rinse your mitt in the clean bucket before reloading with shampoo. Use straight-line washing strokes rather than circular motions. Rinse from the top down and dry with a clean, dampened microfibre cloth using a blotting or straight-line motion.
Step 2 — Clay Bar Treatment (Optional but Recommended)
A clay bar removes bonded surface contaminants — tar, iron fallout, industrial deposits — that washing alone cannot shift. Cape Town's industrial areas near Parow Industria and Bellville mean vehicles often pick up airborne contamination that embeds in the clear coat. Lubricate the paint with a clay lubricant spray and glide the clay bar in straight lines. The paint should feel noticeably smoother afterwards.
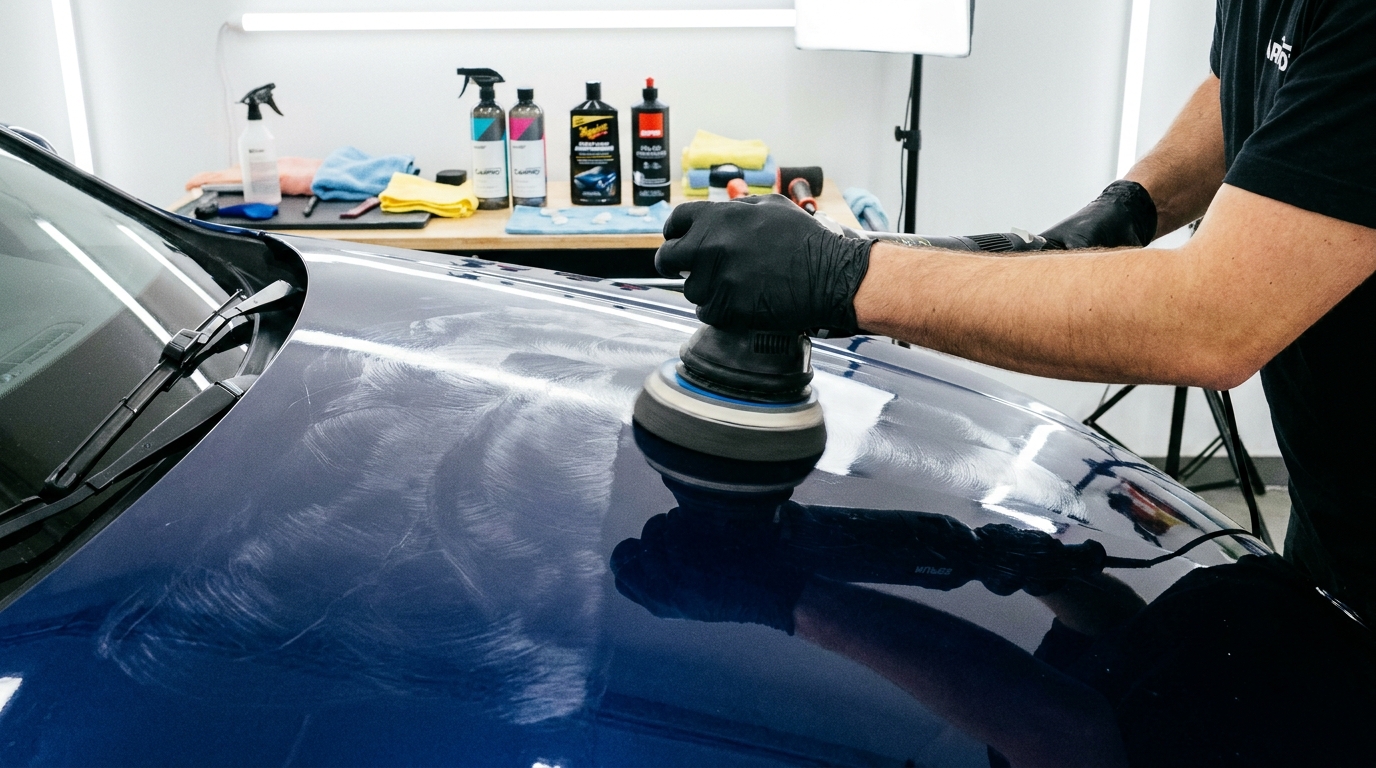
Step 3 — Machine Polish with a DA Polisher
A dual-action (DA) polisher is the safest tool for DIY paint correction. Unlike rotary polishers, DA machines oscillate and rotate simultaneously, making them far less likely to burn through the clear coat. Apply a pea-sized amount of cutting compound to the pad, spread it at a low speed, then work in overlapping straight lines at medium speed. Work on a small section — roughly 40cm x 40cm — at a time.
For light swirl marks, a light abrasive polish combined with a foam polishing pad is often sufficient. For heavier swirl marks or more visible scratches, you may need a cutting compound first, followed by a finishing polish to restore gloss.
Step 4 — Finishing Polish
After machine polishing with a cutting compound, follow up with a fine finishing polish using a soft foam pad. This refines the surface to a high gloss and removes any micro-marring left by the cutting stage.
Step 5 — Protect the Paintwork
Once the surface is corrected and clean, apply a wax, paint sealant, or ceramic coating to protect the freshly polished paint. A good quality carnauba wax will last several weeks; paint sealants provide several months of protection; ceramic coatings can last one to five years when applied correctly. Given Cape Town's UV intensity and coastal salt air, paint protection is a worthwhile investment.
When to Call a Professional Panel Beater or Detailer
DIY correction has real limitations. You should contact a professional when:
- The scratch has penetrated through the colour coat — No amount of polishing will hide a scratch that has removed the colour. A respray of the affected panel is required.
- You can see bare metal or primer — Exposed metal will rust quickly in Cape Town's coastal environment. Professional panel beaters will clean the area, apply primer, colour coat, and clear coat to restore the panel correctly.
- The damage covers a large area — Full-panel paint correction and respray is the only reliable solution for widespread severe scratching.
- The paint is already very thin from previous polishing — Repeatedly polishing removes clear coat. If the clear coat is exhausted, further polishing will only damage the colour coat. A professional can advise on whether a respray is necessary.
- You are unsure — If in doubt, a professional assessment costs nothing and prevents an expensive mistake.
Preventing Swirl Marks Going Forward
Once you have corrected your paint, the goal is to prevent swirl marks from returning. The most effective habits include:
- Always use the two-bucket wash method with clean microfibre mitts
- Avoid automated brushed car washes — touchless washes are a safer alternative
- Never wipe a dry, dusty car — rinse it first
- Use dedicated wash and drying microfibre cloths, washed regularly without fabric softener
- Apply quality paint protection — wax, sealant, or ceramic coating — to create a sacrificial layer that absorbs minor abrasion
- Park in the shade where possible to reduce UV degradation of the clear coat
- Rinse your car with clean water after driving near the coast or through salty air
For Cape Town drivers in areas like Durbanville, Brackenfell, and Goodwood, dust and airborne particles from construction and dry summer conditions are an ongoing challenge. A ceramic coating or regular professional detail can make a significant difference to long-term paint condition.
Professional Paint Correction at Collision Coachworks
At Collision Coachworks, located at 9 Assegaai Road, Parow Industria, Cape Town, our team handles everything from light cosmetic paint correction to full collision repair and respray. We work on all vehicle makes and models — VW Polos, Toyota Hiluxes, BMW 3 Series, Ford Rangers, and everything in between.
If you have scratches that go deeper than the clear coat, paint that needs professional machine correction, or a panel that has been keyed or scraped, we can assess the damage and advise on the most cost-effective repair. We use proper climate-controlled spray booth facilities and automotive-grade products that deliver a factory-quality finish.
Whether you are looking to restore your car before a sale, address post-accident damage, or simply keep your paintwork in top condition, our team is ready to help. Contact Collision Coachworks today to book an assessment or get a quote for your vehicle.
Share Article
Need Expert Advice?
Get personalized consultation from our master technicians.
Related Articles
Mag Wheel Repair and Refurbishment in Cape Town: Your Complete Guide
Damaged alloy wheels don't always need replacing. Discover your mag wheel repair and refurbishment options in Cape Town, what they cost, and when to repair vs replace.
Roof Damage Repair: Hail, Impact, and Structural Fixes for Cape Town Cars
Cape Town's extreme weather exposes your car's roof to hail, branches, and more. Learn what roof damage repair involves, how long it takes, and what it costs at a professional panel beater.
Honda Civic and Jazz Body Repair in Cape Town: What You Need to Know
Own a Honda Civic or Jazz in Cape Town? Discover what makes these popular vehicles unique to repair, what collision damage typically costs, and how Collision Coachworks in Parow Industria delivers expert results.